Wednesday, August 24, 2011

Disaster Relief Shelters - Savannah, GA

So, as I said in the previous post our final project for the summer intro design course was to design emergency units, for people who would need a place to temporarily live in an emergency situation. The assignment was based on a fictitious story that an event such as a hurricane, tornado or other catastrophe would completely clear out our site, and the disaster relief shelters would then be arranged on the site. These shelters would temporarily house 4-6+ people, have no electricity, or running water, and must be easily transported. In the previous post I showed the photo analysis and diagrams of the site and surrounding areas. The next part of the assignments were to try different arrangements for the units. We had to work with a 12' x 24' box and two 12' x 8' boxes. We went into the wood shop and cut out massing models to play with the arrangements of the large box and smaller two boxes and the different units together.
I also did some unit arrangements in CAD:


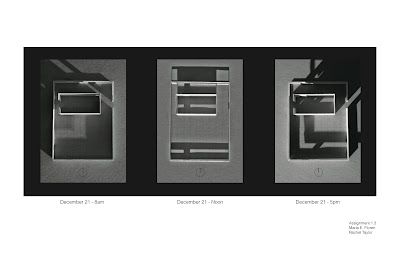
My final design of the unit used the main 12'x24' box for food prep, gathering area, and storage for the evacuees who would be staying in these shelters, and the two additional boxes would be for sleeping 4-6+ people. One of my concern for the units was ventilation, since these shelters would have no AC/electricity I designed my box to have operable louvers to allow for easy cooling for the spaces & also lighting. The idea was basically to be like a step up from camping. The arrangements of the units together on the site created public & private spaces, depicted in the diagrams below. I wanted to keep the Oglethorpe Square as a square and still allow for the public to use it, I didn't want the square to be lost in the my plan.

Above are the sketch up model arrangements on the site, and the physical model I made of the unit arrangements. The central area within the units could be used perhaps as a garden area while the evacuees are living there, or even a just an open green space for the surrounding units.
Orthographic drawings of unit design
Collage of unit, the story for the collage was the idea of children seeking shelter & protection in times of trouble
Elevation of site


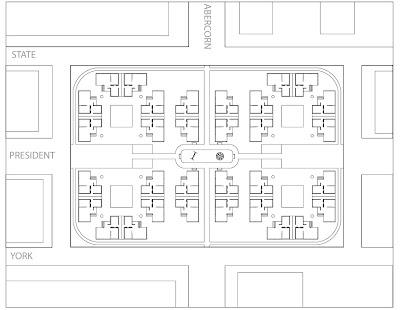
The site plan shows the layout of tall the unit arrangements on the site, the two areas on President St would be public areas, as well as the central area which would be a playground for the children who would possibly be living there as well.
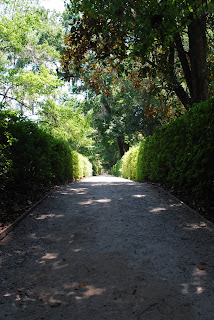
These diagrams help depict the site plan a little better. The walkways shows the paths on the site, for the public as well as the evacuees who would be living there. In the private to public diagram the darker would be the most private and the lightest would be to most public. The buildings diagram shows the building placements on the site as well as the public space diagram.

Okay, so I've tried to share with you my project & ideas, and I apologize if I've left somethings out, or confused you in any way! :) Feel free to ask me any questions, or if you have any comments/ critiques!

That concludes the summer studio projects, from now on out the blog will be more about urban design & community planning, and my experience in the Master of Urban Design program.

Monday, August 22, 2011

MUDD 5050

The purpose of this blog will be to document the work I'll be doing as a graduate student in the Master of Urban design program at UNC Charlotte's School of Architecture. As a recent graduate from UNC Greensboro's Interior Architecture program, I have interiors, graphic, and architectural design experience. You can view my previous work through the side button links. As a new graduate student entering the Master of Urban Design program from a non-accredited architecture program I was required to take the summer course MUDD 5050, which is an basically an intro to design studio. The class started out with the individual assignment diagramming a box within another box to define the typologies: l-shaped, u-shaped, centralized and divided.
From those diagrams in groups of two we chose one of each of the four typologies from our combined work and went on to draft on trace these diagrams of the box within a box of a room within a space. Adding an threshold and apertures to the rooms to strengthen the typologies.

We then built basswood models of the four types and did light studies of them using the heliodon in the Lighting Lab, photographing them at different times of the day and different days of the year.

From those models we went back to doing individual work and each chose one of the typologies from the models we did and built a larger scale foam core model. I chose to continue with the divided typology. The plan illustrates division of the space in quadrants, and the apertures and thresholds help strengthen the typology.


We also did orthographic drawings of this final space.


With the larger scale model we built, we did another light study in the Lighting Lab, this time using the artificial sky and the online WEBHDR software.

With the image that was generated from the HDR photo studies, the next assignment was to make an abstract collage in photoshop to represent the idea of division. At this point the room wasn't meant to serve a purpose functionally, so we had to illustrate in the collage who might use the space, how might material affect it, and where might the box be located. This collage was a really fun assignment to do! It was very abstract and really just meant for you to tell a story of your space while represent your idea.

So! With the idea of division, the apertures and thresholds really signify the different spaces created within the quadrants, which is what led me to do this collage. It basically tells a story of a person who wants to explore and this room could sort of be a capsule which enables them to do that. From one extreme of exploration to another, as far as outer space and as deep as the ocean. Below is our final presentation!


During the previous assignment we took a break mid way and had an assignment of graphically representing data. This data was collected prior to class starting earlier in the summer and we had to account for every 30 minutes from Monday-Sunday. Each person used a different persons data to represent.


Allllllllllll that within the first 3 weeks of the class!


Our final project was based around our five-day class trip to Charleston, South Carolina and Savannah, Georgia. In Charleston we stayed at the Inn at Middleton Place, a contemporary inn on the grounds of Middleton Place, which has a historical landmarks and gardens. We also stopped in-between the two cities in South Carolina to do some charcoal drawings of the Sheldon Church Ruins, which was an old church from the mid 1700s. Below are some photographs taken on the trip, I apologize for the layout of the photos below...I couldn't organize it nicely!


The Inn & Gardens at Middleton Place

The Sheldon Church Ruins, SC


Charleston, SC


Savannah, GA


Our final project was to design an emergency shelter.

We had two sites to chose from to do our project. One was a waterfront park in Charleston and the other was one of the squares in downtown Savannah. Below are the photo analyses I did for both of the sites.

Study of light & shadow, Charleston site

Surrounding city "thresholds", Charleston


So, for my project I chose to do the Savannah site, Oglethorpe Square. Savannah's riverfront downtown is made up of park like squares about every other block. Below are the photo analyses & diagrams of the site I've created.

City Context

Landmarks Diagrams, Savannah, GA
Elevation Diagrams, Savannah, GA

Savannah diagram analysis, Oglethorpe Square & other surrounding squares

Oglethorpe Square Panoramic


My next post will show my process & final images for the MUDD 5050 project, and that'll conclude the summer semester assignments. After that I'll be blogging about the projects, assignments, & thoughts as a graduate student in the Master of Urban Design program, so keep following! :)